Monday, June 4, 2018

A real world stress test - 4k h.265 encoding


A real world stress test - 4k h.265 encoding

This guide is a help to create a easy to reproduce, real world stress on the CPU with the workload of encoding a h.265 video file. You only need 2 executables and a batch/cmd line for this.

The purpose of this is to have a simple way to simulate the taxing workload that occurs during a video encode, and without the need of having a huge source file on your HDD.

On my own render rig (R7 1700@3.85ghz~1.3v) the tool Prime95 29.1 with "Small FFTs" creates a power consumption of ~254 Watt (from the wall).
During the encoding of a video file, the rig pulls about ~245 Watt. So this workload is very close to the so-called "unrealistic" Prime95 strain.

This stress test is simply a single command line. It pipes FFMPEG and x265 together to encode a virtual video file in memory. The big advantage of this method is, that there is no need to have a source video file, which is usually many gigabytes in size, and also there is no video file to be written to the disc. All is done in RAM. Though, you need a minimum of free RAM for this to work, see list below.

If you have access to ffmpeg.exe and x265.exe on your PC, then simply copy both files into one folder and execute this command line:

ffmpeg -f lavfi -i nullsrc=s=4096x2160 -r 25 -filter_complex "geq=random(1)*255:128:128" -t 6 -strict -1 -pix_fmt yuv420p10le -vsync 0 -f yuv4mpegpipe - | x265 --input - --y4m --output-depth=10 --profile=main10 --preset placebo --tune fastdecode --crf 27 -o NUL

Note:

  • The "-t" value changes the total run time of the stress test. It determines the length of the virtual video in seconds. But please keep in mind that this also changes the minimum needed RAM. (see table below)
  • When you start the script, FFMPEG is first creating the video in memory (prebuild time), which takes time until it is finished. After that, x265 is encoding the video on full CPU load.
  • Sometimes the mouse pointer and system freezes for a minute. This does not mean that your PC has crashed! Just let the computer running and it will recover after a while. The PC does still do its work, but the system just becomes unresponsive for a short time. The best way to detect this "soft-crash", is to use a power meter, as during this freeze, the power consumption is still at maximum. In case that your system crashes, the CPU goes to save mode and the power consumption is way lower than during a stress test. e.g. ~153 Watt, on my rig. In case of a hard-crash the fans should also start to run slower than under full load, so you can hear it too. At least on my motherboard. Another way to detect these soft crashes is to simply play a audio file or video in the background. The encoding priority is low, so that it should not break any playback during this freezes.


I found out that an unstable OC usually crashes after 5-30 minutes. Everything above is dependant on environmental changes, like ambient temperature or simultaneous PC usage for other task, that will lead to a higher chance to crash the PC. If you want to be sure, then use a "-t" value that takes you PC to encode for about 1-2 hours

You can end the this encoding task at any time a with CTRL+C or closing the window.

You can get the executables from these sources:
- x265.exe - https://www.videohelp.com/software/x265-Encoder
- ffmpeg.exe - https://ffmpeg.zeranoe.com/builds

I also have uploaded a zip file with everything included (batch file and executables):
DOWNLOAD

--------------------------------

Table for the runtime: [WIP]
(CPU: R7 1700@3.85ghz - 3200CL14)


[setting] [prebuild time] [ram usage] [runtime]
t1 20-50sec ~2,0-2,3gb
 392s, 6:31min 0,06fps  
t2
50-100sec ~3,4-3,6gb
812s ,13:31min 0,06fps  
t4
60-120sec ~5,5-5,8gb

Wednesday, March 8, 2017

OSD with RTSS and HWiNFO [WIP]

This is a small guide on how to set up RTSS and HWiNFO. It is a WIP and English is not my native language, so please excuse grammatical errors and formatting, 


Why HWiNFO + RTSS?

You can show ALL sensors that are available in HWiNFO on your OSD with RivaTunerStatisticsServer (in short; RTSS).

HWiNFO provides all the sensor data for you OSD, while RTSS is the tool that actually provides the overlay graphic function, You have to install both do be able to show more sensors in your OSD then just MSI Afterburner can show. Afterburner has only a limited amount of sensors due to the nature of being a GPU orientated tool.

HWiNFO is updated more regular and supports new hardware faster then AB and also has more sensors overall, HWiNFO is not limited to only a few sensors of your GPU/CPU/RAM and can show you every sensor that can be tracked by your hardware. The sensors can be shown in any combination or order.

So if you like to monitor your download speed, HDD temperature, Voltages or GPU power consumption while you are gaming or Benchmarking, you can do this with HWiNFO+RTSS. HWiNFO also provides more sensors with more useful data then AB, like power consumption, per core frequency and many other sensors.


The next picture is an example of how I set my OSD up, but of course, you can configure the OSD to your own taste and needs.

The red lines shows the distribution of the OSD info among the screen.


Installation and configuration of the tools


At first, you have to install the tools HWiNFO and RTSS. You can simply install MSI Afterburner which contains the latest stable version of RTSS, OR if you absolutely don't want to have MSI Afterburner installed on your PC, you can also just install RTSS as a stand-alone tool.

If you decide against MSI Afterburner, then you will loose the following features related to the OSD:
- no hotkey toggle on/off for the OSD
- no frametime sensor data
- no API detection (no OPENGL/D3D../VULKAN label)

All other AB sensor data can be substituted with the HWiNFO sensor data,

In this guide, I will not explain the configuration of Afterburner and will only focus on how to configure the OSD with HWiNFO.


Installation:
The installation of MSI Afterburner is straight forward, Just install the tool, you may have to reboot for RTSS.

The configuration of HWiNFO is a little bit more cumbersome. Here are some pictures that illustrate every step of the configuration:


HWiNFO - setup and start settings:


After the installation of HWiNFO, you have to activate "Sensors-only" and open the Settings page.


Activate the options marked in the picture. This will start HWiNFO minimized and without the sensor summary. Use these settings for or a quick and clean boot-up without the splash screen.


HWiNFO - Sensor configuration:


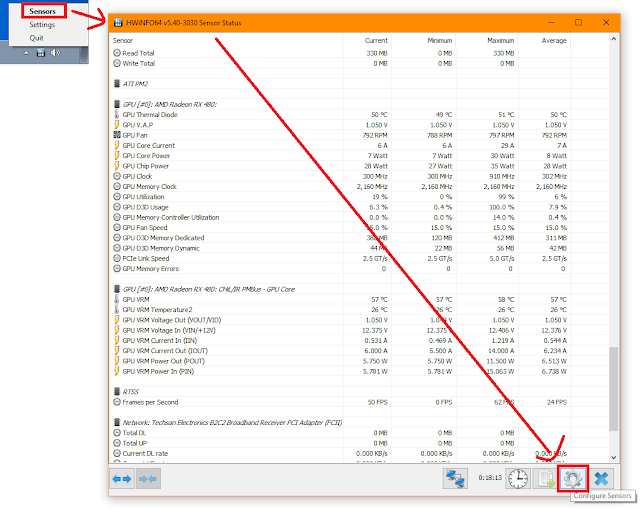
Open the Sensor Status page by either double click on the tray icon or use the pull-down menu. This is the main sensor display page. Here you can monitor the sensors that are detected by HWiNFO, To configure the OSD you have to open the config window.


HWiNFO - "OSD (RTSS)" tab:


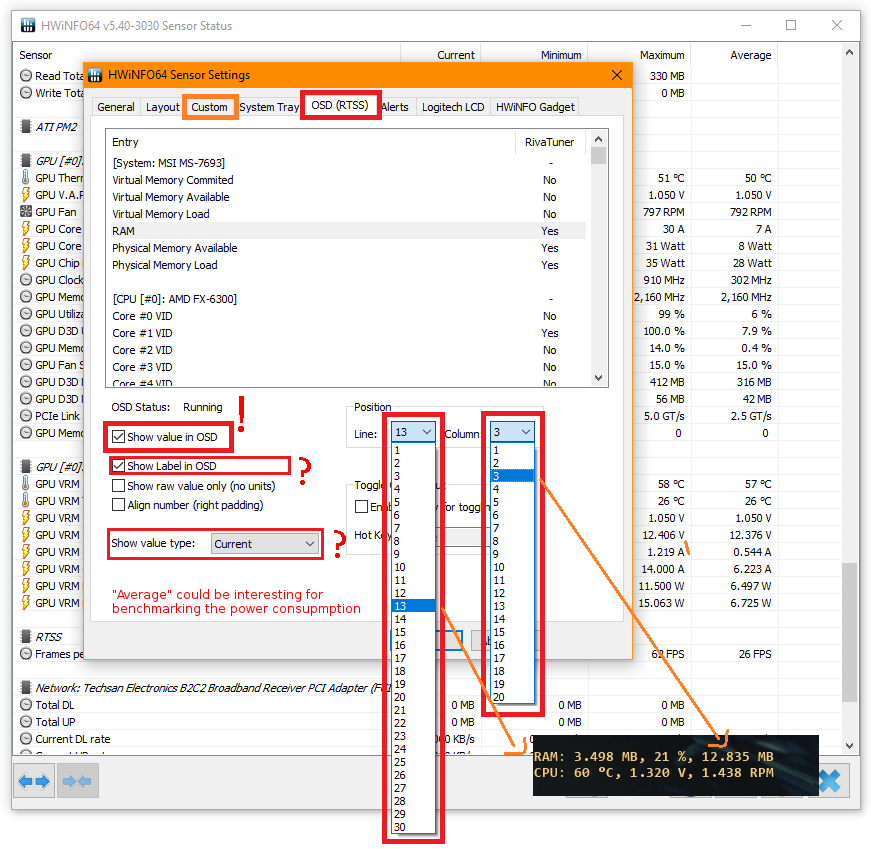
Switch to the "OSD (RTSS)" tab. This is where you set up the sensors that will appear on the OSD. Activate "Show value in OSD" to show this sensor data on your RTSS OSD.

Here you can also set the position of the data on the OSD and toggle the label of the sensor. If you set more then one sensor to one line, then you only need one of these sensors to have the label activated. You can modify the name of the label on another page.


HWiNFO - "Custom" tab:


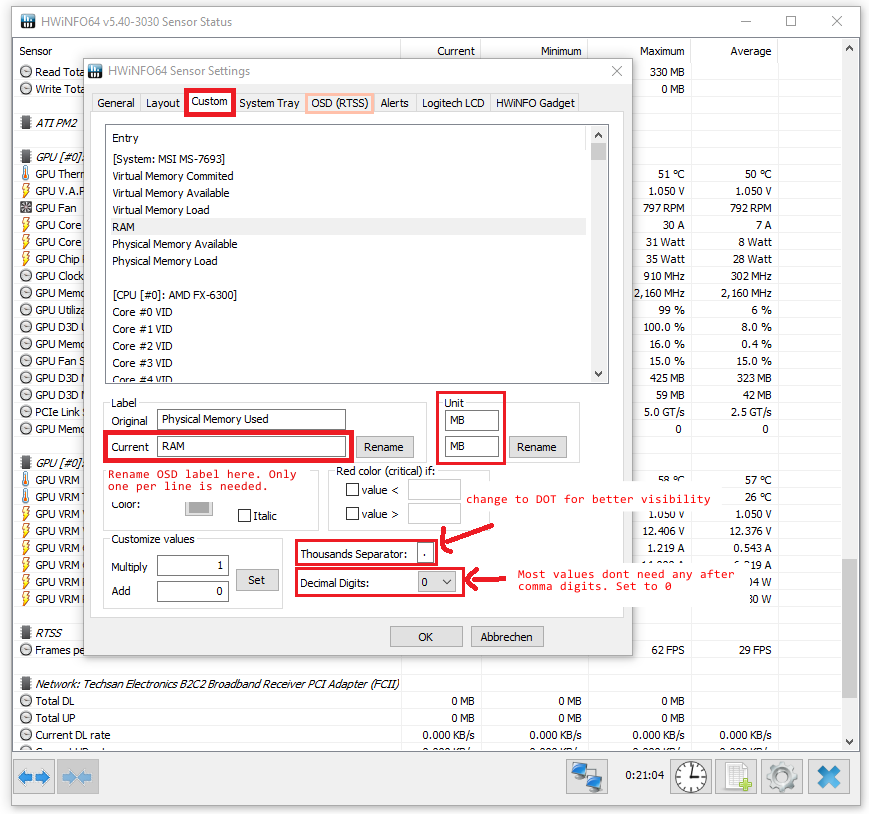
The "Custom" tab is where you modify the senor label, units, and decimal place. Basically, this is where you do the cosmetic changes to the OSD information.


Custom OSD font:


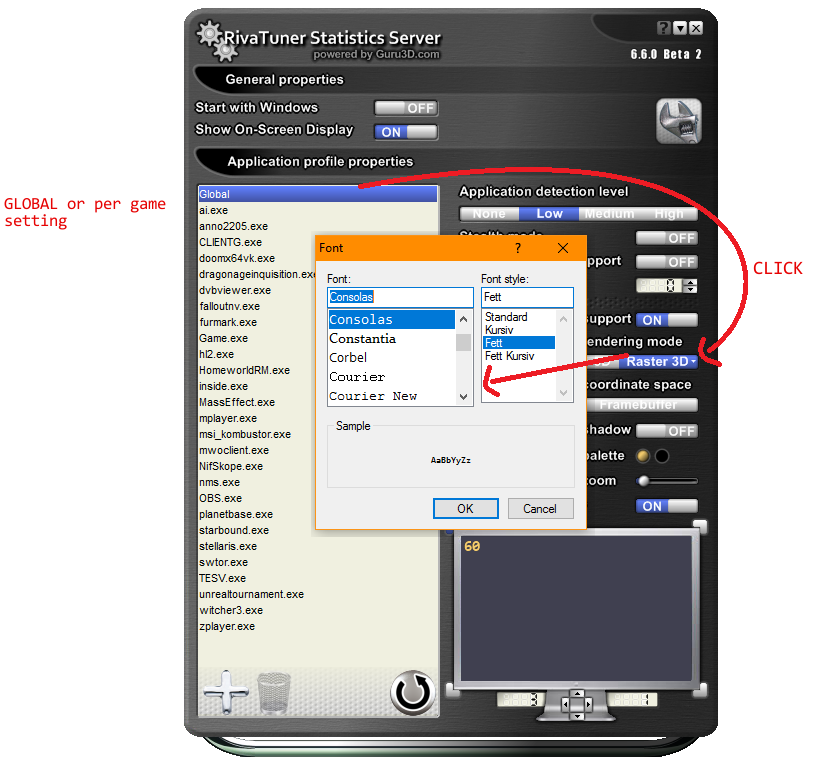
If you like to have a different font as the default "blocky" font of RTSS, then you can change it here on the "Raster 3D" option. I prefer the Consolas font, size 8/9


Modify the font size:


The only way to change the font size in RTSS is currently to edit the INI setting files.
The files are located in "C:\Program Files (x86)\RivaTuner Statistics Server\Profiles". If you set the "GLOBAL" font size then it will inherit the size to all game profiles that are created in the future. All games that already exist in your RTSS configuration window have to be edited manually.


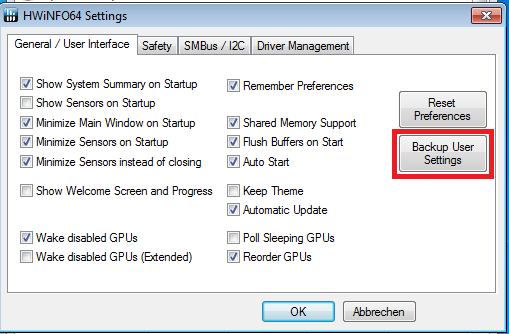
HWiNFO - Backup and restore settings:


When you have finally set up the OSD to your liking, then you should backup the settings. This option will save the settings as a registry key file on your computer.

Unfortunately, the format that is used to store the OSD settings is not trivial and can not be directly modified to show different OSD layouts. If you like to have multiple layouts of your OSD, then you have to edit the OSD in HWiNFO and save it as a different registry backup file. You can then change the OSD layout quickly by restoring the backup file.


Note:
You can rise the polling rate on the "General" tab, but keep in mind that an excessive high polling rate can slow down your computer applications and introduce stutter in games. This is a general problem with data polling and not confined to the usage of HWiNFO.


Note:
Quote from RTSS doc; Version 5.3.2 (published on 15.09.2013) :
On-Screen Display text length limit has been extended from 256 bytes to 4 kilobytes per application slot.


This example is an updated version of the OSD that I am using currently (8/2019)


/u/Losawe